How to Set Up Zoom Classes with Acuity Scheduling

“Can I set up a series of yoga classes on Zoom with my Squarespace website?”
This was a question I was asked by one of my clients. The answer – Yes, absolutely!
You can set up a series of videos on Squarespace, using the video pages. And you can have them as paid videos using Squarespace Member Areas, but those are for pre-recorded classes. To do live Zoom classes you’ll want to use Acuity Scheduling with the Zoom Integration.
Here are the steps to integrate your live Zoom classes with your Squarespace website using Acuity Scheduling.
1 – Set up your Acuity Scheduling
To set up your Zoom classes you will first need to set up Acuity Scheduling. Click on Scheduling on the main menu to start your two week free trial.
Scheduling Pop-Up
A pop-up will appear immediately, asking you your business name and to name your scheduling URL.
Then you need to add your first appointment type or class.
Name your class
Add the duration of your class (in minutes)
Choose Class (Group)
In number of slots, add the number of people allowed in the class
Set the price (optional)
Then you will set up when the class is available, and whether it recurs. Finally, you can connect your payment processor now or wait until later.
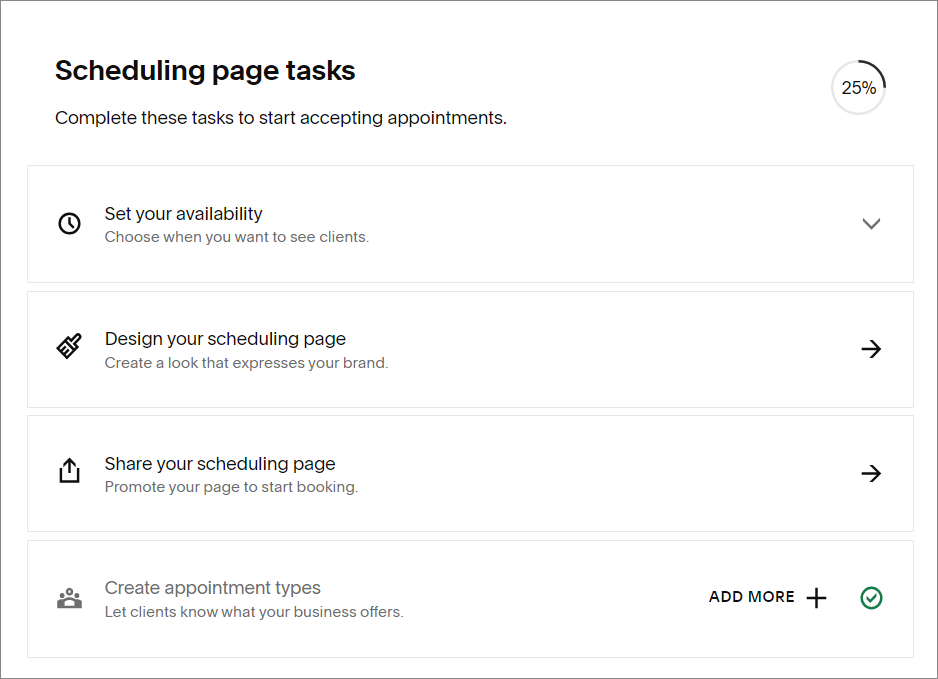
Scheduling Home Page
On your Scheduling Home page you will see a list of scheduling page tasks.
Set your Availability
Design your Scheduling Page
Share your Scheduling Page
Create Appointment Types
For more information, see related post (tutorial): How to Set Up Acuity (Squarespace) Scheduling on your Website.
2 – Edit your First Class
You’ve already created your first class in the pop-up. Now you’ll want to make sure all of the information is correct before you share your scheduling page.
Click on Create Appointment Types in the task list. Then scroll down and click View Additional Settings. (You can also get here by clicking Appointment Types in the menu.)
In this section you’ll see 3 buttons at the top: New Type of Service, New Type of Group Class and Preview.
Click on the Preview button. This will show you how your class will look to your clients.
If your information isn’t correct, or is just incomplete in some way, click the edit button next to your class name. You’ll be able to change the information and add details to your class.
*Previewing is an important step. When I saw the preview from the first class I created, I quickly realized I had made a mistake. I created a recurring class, but people could sign up for each class individually. I wanted them to sign up for the entire series of classes. It was a simple fix in the edits – just click a checkbox.
3 – Create More Classes (if desired)
Want to add another class (or two)?
From the Scheduling Menu click on Appointment Types
Click New Type of Group Class
Add your class details
Click Create Appointment Type
Now your new class is created, but you still need to add the dates and times that it will be offered.
Click Offer Class
Choose the date of your class or the start date & time
Click Recurring if you want your class on more than one date
Click on Save Class
You now have another new class.
4 – Add a Payment Processor to Receive Payment
Acuity makes it really easy to collect payment for your classes. You can receive payments through Paypal, Square (US only) or Stripe
From the Scheduling Menu scroll to Business Settings
Click Payment Settings
Set your currency and payment options
Connect to your Payment Processor
Save
5 – Add your Zoom Integration
Now we’ll set up Acuity to work with Zoom. Please note: you need to have a paid Zoom account to add this integration.

From the Scheduling Menu scroll to Business Settings
Click Integrations
Click Video Conferencing from the menu or scroll down the page to find Zoom
Click the Set Up button under Zoom
Connect to your Zoom account
Now choose which Classes will be on Zoom and your meeting options
Save
If you want to add or change which classes are integrated with Zoom go back to Integrations. Click the edit button under Zoom (where the set up button was before). You can now add or remove checkmarks from your classes.
6 - Add Scheduling to your Website
Now that your class is ready to go, you just need to add your classes to your website. Acuity Scheduling works with many website platforms, but if you have a Squarespace website this next step is super easy.
To place your class options on your Squarespace website:
Create a new page or go to the page you want to place your classes
Click Edit
Add a section or hover over the section you want to edit
Click + Add Block
Choose Scheduling from the pop-up, then drag into place
If you don’t see your classes right away click on the pencil icon
Choose All Public Appointment Types
Click Save
7 – Upgrade to a Paid Plan
You have a two week free trial when you start with Acuity Scheduling. After that you’ll need to upgrade to a paid plan. Once that time is over your Acuity Scheduling will stop working.

On your Scheduling home page you’ll see how many days are left on your trial. Click on Subscribe to choose your Scheduling Plan. Most of my clients use the Emerging Plan, but if you have multiple teachers for your classes you will need the Growing Plan.
*Once you have a paid plan you can customize all your email notifications.
Now you are ready for your Zoom classes!