Going Live: How to Upgrade to a Squarespace Plan & Custom Domain

Your design is complete and website is ready to go live on the internet.
So what now?
You need to upgrade your Squarespace trial site with a Squarespace hosting plan and get your own custom domain name.
Here are the steps to get you up and running!
Table of Contents
Upgrade to a Paid Squarespace Plan
Squarespace hosts your free trial website for two weeks (longer if you are working with a Circle member), but before that ends you will need to upgrade to a paid plan.
Step 1: Click to Upgrade
On your trial site you should see a “Subscribe” button at the bottom of your screen. Click button.

If you don’t see the button, first check to see if you are on the correct website. If it is the right website do the following:
From the Home menu click Settings > Billing
Click Subscriptions then click the website under Trial Subscriptions
Click the Subscribe button
Step 2: Choose a Plan
Now you can choose your subscription plan. The option of whether to pay monthly or annually will come afterwards. I generally recommend paying annually as you get the free domain offer for the first year, and the cost is less overall.
Personal Plan
If you are building a simple website or blog, the Personal Plan may be for you. It includes the drag and drop Fluid Engine builder, SSL security and the new invoicing and project management tools. You can have two contributors on this site.
Business Plan
This is the plan that I choose most often for my clients. It includes all the basic features of the personal plan but adds premium features like the announcement bar, promotional pop up and the donation block. It also allows you to sell products or services online (with a transaction fee). You can have an unlimited amount of contributors on this site.
The Business plan also allows you to add custom code to your website, so you can customize your design even further.
Commerce Plan
There are two Commerce Plans (Basic and Advanced). They both come with more commerce features than the Business Plan and have no Squarespace transaction fees. The Advanced Plan has features such as advanced shipping and discounts, as well as abandoned cart recovery.
Step 3: Choose a Billing Term
You can pay your bill each month or once a year. Annual plans are discounted.
Step 4: Enter Your Details and Subscribe
It’s now time to enter your billing address and choose your payment method (PayPal, credit card or debit). If you are a Canadian business, you can also add your HST number.
Review all your details. Then click Confirm & Purchase to subscribe.
Get Your Custom Domain Name
Every Squarespace site come with a free subdomain. It’s made up of a string of randomly generated words followed by squarespace.com. I always recommend you change the built-in domain name (or subdomain) while you’re working on the trial and then get a custom domain name when it’s time to make your site public.
And, if you purchased an annual plan, you can get a free custom domain for the first year.
From your Home Menu click Settings
Click on Domains & Emails then on the page click Domains
Click on the Get a Domain button
Add the domain name you want into the Search for a Domain field
You will now see a list showing which sites are available with the free offer (first year only), the price for domains that are not part of the offer and domains that are not available
Click on the domain name(s) you would like to add to cart then click on the Checkout button
Fill out your registration information, then click Save and Continue
Review your information, then click Confirm & Purchase
There’s just one more important step. You’ll receive an email from asking you to verify your email. You need to verify (just click the link) within 15 days of registering your domain or the registration won’t go through.
It can take up to 72 hours after the verification for the domain to be complete. You can check in your account dashboard (click domains) to see the status.
Publish Your Website
Now there’s just one more step. It’s time to share your site.
As a trial site your website could only be seen privately (by the contributors only) or with a password, but now you can set your site to public.
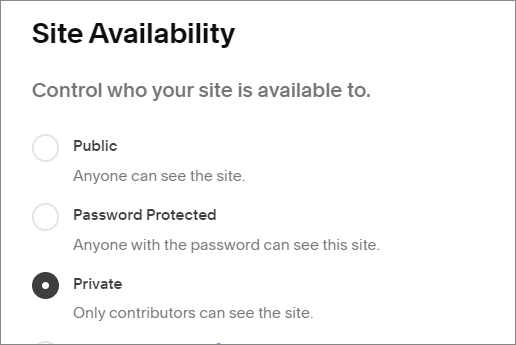
From your Home Menu click Settings > Website
Click on Site Availability
Click Public & then click Save
Your website is now live on the internet!