3 Ways to Show off Your Featured Blog Posts in Squarespace

Do you have a blog post or two that you’d really like your visitors to see? Do you want to show off your most popular posts?
One of my favourite things about working with Squarespace 7.1 is the ability to customize the blog page. Here you can add sections above and below your blog post thumbnails.
This means you can add a cool blog header, add a form for your opt in, or show off your most popular or featured posts.
Here are 3 easy options to do just that!
Option 1 – Create a Featured Post with an Image & Text
You don’t have to do anything fancy or complicated to show off your featured post. Just add a new Fluid Engine section to your page, add an image and some text and then link it to your blog post! You could even add a video to this section.
To make it even easier, you could pick one of the premade image section layouts when adding your section.
This option gives you a lot of creative freedom, but it does mean you have to create the post manually. I think it’s perfect when you have just one post that you want to feature.
Option 2 – Show Featured Posts with a Summary Block
This is the option I that use most often to show featured posts on my client’s websites. The summary block pulls information from your blog (or other collections) and which you can then display as either a wall, grid, list or carousel.
You can use the summary blocks to filter your posts by category, tag, date or you can choose to show your featured posts.
Here’s an example using some of my most popular posts with a carousel or slider layout:


To show featured posts using a summary block you’ll need to set up the summary block and indicate which posts are featured.
Set up your summary block:
Add a blank section to your main blog page
In the left corner of your section click +ADD BLOCK
Choose Summary from the block choices
Click on the pencil icon to set up the block
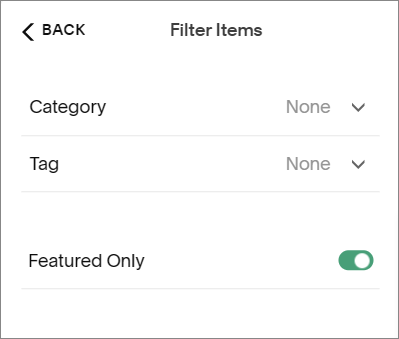
In the Content tab select your blog page, then click Filter Items
Toggle Featured Only to the on position (green)
Use the Design tab to set your layout
Indicate that a blog post is “Featured”
Hover over the blog name in the blog list
Click on the 3 dots •••, then click Settings
In the Options tab toggle Featured Post to the on position
Using a summary block makes it really easy to switch in and out different featured posts. It does have a few layout options, but some people do find them a bit limited.
Option 3 – Use an Auto Layout Section to Show Featured Posts
So what do you do if some of your best posts or articles aren’t located on your own website, but elsewhere on the internet? You can still feature them on your website, add links and images using an auto layout or auto list section.
Some people also choose to use an auto layout as it has more design options than using a summary block. You can even make a slider with a full width image.
Here’s an example of one I created for an amazing client who writes articles for several publications:

To create an auto layout section:
Hover over your page and click +ADD SECTION
Click the People tab and choose a layout with the ⓘ
Hover over the section and click edit content
Now you can choose your design, the elements you want displayed, and add your content

The downside to using an auto layout section is that each blog needs to be entered manually, so if you want to change out your featured posts often it may not be the best choice.
Now you’re ready to show off your featured posts! Try one of these options on your blog page or add a sneak peek of your blog on your home page.